
It seems as if I have been using lesson plan notebooks my whole teaching career. I know I haven't because I can vaguely remember the little green lesson plan books that had a few lines and a place to put the date and grade taught. These work well for some teachers. However, if you are a detailed OCD type personality, those little green books are what nightmares are made of! My large, bold left-handed handwriting is also an enemy of tiny lines in tight spaces.
Being the crazed detail person that I am, those little green books disappeared from my classroom early on in my career. I have used my lesson plan notebooks as far back as when the state of Georgia was using the QCC's (I can't even remember what the initials stood for it's been so long ago). I redid all lessons when the Georgia Performance Standards (GPS) were introduced. Now I have been redoing my lesson plans all over again since the Common Core Performance Standards (CCPS) were implemented last year. I feel so strongly about my notebooks, it is well worth the effort and time to redo my plans each time the standards change.
My notebooks are never complete though. I add and take away items and plans each year. I revise and redo! Most of you know that even a great activity on paper can bomb in a real-life classroom. Those activities are taken out and my lesson plan is revised, and a new activity takes its place.
Although I rarely use my lesson plan notebooks while I am teaching, it is a daily lifesaver for me when preparing for the next day's lesson. I have everything I need...no surprises. My students and I are able to utilize every second of everyday in the classroom.
Organization of My Lesson Plan Notebook
I always label the front and spine of the notebook with the name of the unit I will be teaching. I usually use the generic name. As you can see, this notebook is simply labeled Place Value 1. (Yes, this unit has 2 notebooks). Most of my notebooks only have 1 volume but, my place value (NBT) unit is rather lengthy.

When the front cover is opened, I always have a yellow section that is labeled To Be Copied at the front of the notebook. I laminate 2 yellow pieces of copy paper and place red sticky tabs in the outside middle of the yellow papers. They are then placed together in the notebook, (the plain one in the back of the one labeled To Be Copied. All papers that I will need to copy for the unit are sandwiched between the yellow sheets.
It is so easy to add or remove papers at any time! This also makes it easy to copy everything I will need for the unit at one time. There it all is at my fingertips.
It is so easy to add or remove papers at any time! This also makes it easy to copy everything I will need for the unit at one time. There it all is at my fingertips.

The next section in my notebooks is the lesson plans themselves. Before I place a lesson plan in the notebook, I place it in a see-through sleeve and attach a sticky tab on it which tells what day the lesson plan will be used.

I use a template to keep my lesson plans uniform. It is a basic template that I adjust as needed since I keep it on my computer. Preparing my plans digitally makes revisions and additions much easier. Below is an example of one of my daily measurement lesson plans.

I'm a color-coder...a symptom of OCD, I think. :) I color-code all items throughout my lesson plan red if the items need to be printed. I color-code any notes, manipulates, large charts, resources, etc... in blue to indicate that I already have these materials. Blue is a signal that I need to locate the items or lay out my notes on my digital projector. The yellow high-lighter is used for various things, such as differentiation of assignments, a flashing-neon sign that homework is being assigned, or as a spotlight on a crucial part of my lesson.
I have tried many variations of labeling my daily lesson plans throughout the years. After much trial and error, I use the most simple way possible...I label my days as day 1, day 2, day 3 and so on. This way, no matter what happens...a snow day, holiday, or surprise fund-raiser event, I will not need to relabel my plans.

If you look closely you will notice that some of my lesson plans say 3b or 3c. This is where I have made additions to the original lesson plans. No one should ever be content to teach exactly the same thing every year! Change is good. Change keeps things interesting!
Placing the lesson plan in the notebook is just the beginning. I use my notebooks for so much more than my lesson plans. Behind each day is where the really important items are. :) A three-hole punch is my favorite teacher tool! I punch holes in everything I can and place it in my notebook. I place any mini-posters (anchor charts) answer keys, notes, vocabulary, pictures or diagrams, student examples from years past, notes on common errors, misc. resources, as well as the kitchen sink behind each lesson plan. :)
Mini Poster (anchor chart) that I will use on the digital projector for the day.
Mini Poster (anchor chart) that I will use on the digital projector for the day.

A copy of the cover of the book I will read for the day

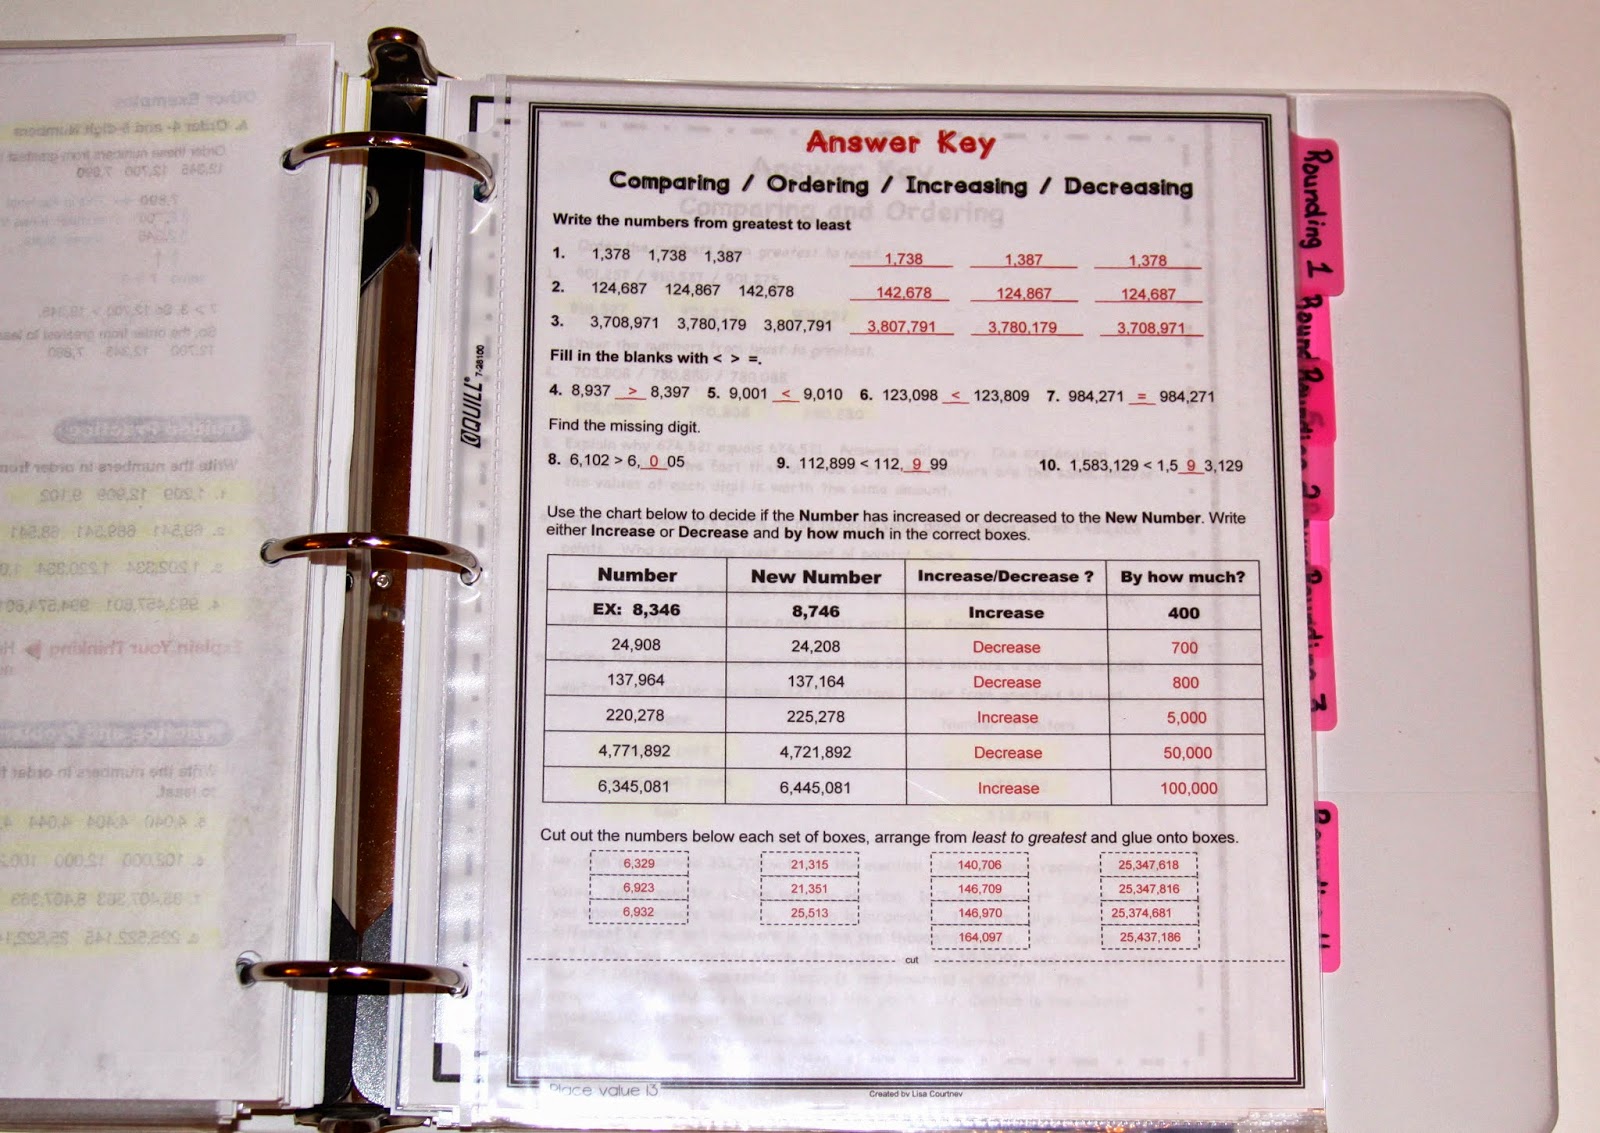
Answer Key - It is always readily available.
Student example of vocabulary notes

Directions for an Activity

I am planning on adding a few other features to my lesson plans this fall, such as a section labeled informal assessment.
Any other items I use but will not fit in my lesson plan notebooks are filed or stored in certain places in my classroom for easy accessibility. I will be posting my organization of the manipulatives and activities I use in future posts.
I love, love, love organizing things!
I especially love my notebooks.
I am "famous" around my school for them. :)


Love this! I especially like how you copy your read aloud covers right into the unit. Clever idea.
ReplyDeleteI have a question for you! On this post - http://mrs-c-classroom.blogspot.ca/2011/11/few-things-about-me.html - you showed your desk group supply caddies. I'm wondering where you purchased them. They are amazing, and I haven't seen anything like them. Thanks for your help!
Hi Tanis. The large caddies were already at my school when I began teaching there. There were only 5 though and I had 6 groups, so I had to find another one. I had never seen them before either. The caddies are made by Rubbermaid. It's been a while, but, I believe I ordered it online through Rubbermaid. I hope this helps. I love the caddies!
ReplyDelete